
How to Read and Interpret Embroidery Patterns (Without Getting a Headache)
 Embroidery patterns can look like a foreign language when you’re new to machine embroidery. Don’t worry—you don’t need a secret decoder ring. Once you know what to look for, reading and interpreting patterns becomes a breeze (and way less intimidating). Let’s break it down, step by step.
Understanding Machine Embroidery Files
First things first:
Embroidery patterns for machines are digital files (like .DST, .PES, .EXP, .JEF, etc.).
Each file format is specific to certain brands or types of machines, so always check your machine’s manual to see what formats it reads.
Pro tip: If you’re ordering or downloading designs, make sure you get the right file type for your equipment!
What’s in a Pattern File?
A typical commercial embroidery pattern includes:
Stitch Map: The path your machine will follow, showing the sequence and direction of stitches.
Color Stops: Markers for when to change thread colors. Your machine will pause so you can swap out the right spool.
Stitch Count: Total number of stitches in the design—handy for estimating run time.
Design Size: The dimensions of the finished design (in inches or millimeters). Make sure it fits your chosen hoop!
Thread Chart: A list of recommended thread colors (often with brand codes) to match the original design.
How to Read a Pattern
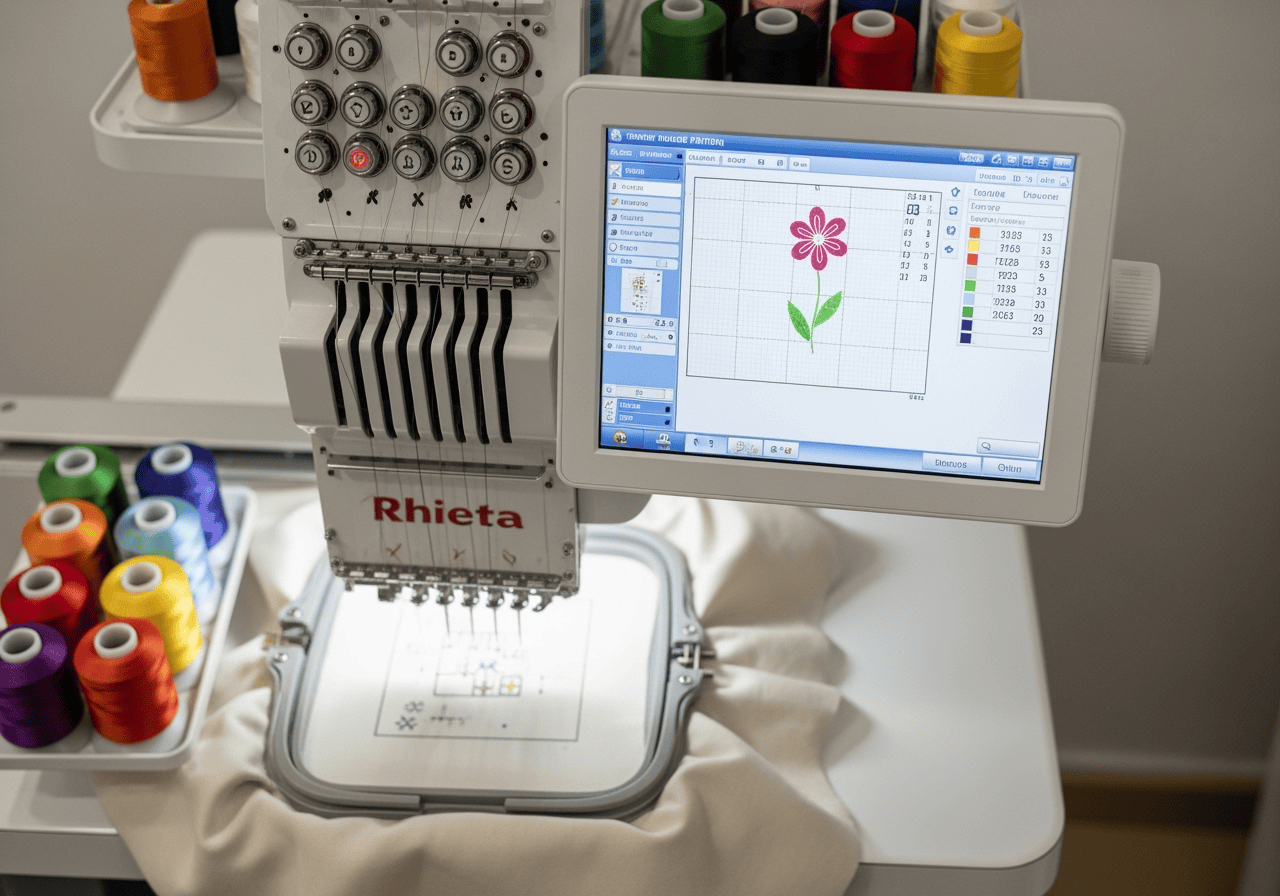
- Open the File in Your Machine’s Software:Most commercial embroidery machines have a built-in screen or companion software. Load your file to preview the design.
- Check the Size:Compare the design’s size to your hoop. If it’s too big, you’ll need to resize or pick a larger hoop.
- Review Color Stops:The software will show you when color changes happen. Double-check you have all the thread colors you need before starting.
- Preview the Stitch Sequence:Watch a simulation (if your machine has this feature) to see the order in which elements are stitched. This helps spot any surprises before you hit “start.”
- Load Your Threads and Hoop Your Fabric:Follow the prompts from your machine—most will guide you through each step, from threading to hoop placement.
Common Pattern Symbols and Terms
Jump Stitch: When the needle moves without stitching (usually between elements).
Trim: The machine will automatically cut the thread at certain points.
Underlay: Foundation stitches that help the design sit smoothly on the fabric.
Tips for Beginners
Start with Simple Patterns: Fewer color changes and lower stitch counts mean less can go wrong.
Keep the Manual Handy: Every machine has its quirks—your manual is your best friend.
Don’t Be Afraid to Test: Run a sample on scrap fabric before stitching your final piece.
Final Thoughts
Reading machine embroidery patterns might feel overwhelming at first, but with a little practice, you’ll be interpreting designs like a pro. Remember: every great embroiderer started as a beginner! If you ever get stuck, reach out to your local embroidery shop (hint: we love helping) or join an online community for extra support.
