
Tips for Picture-Perfect Results
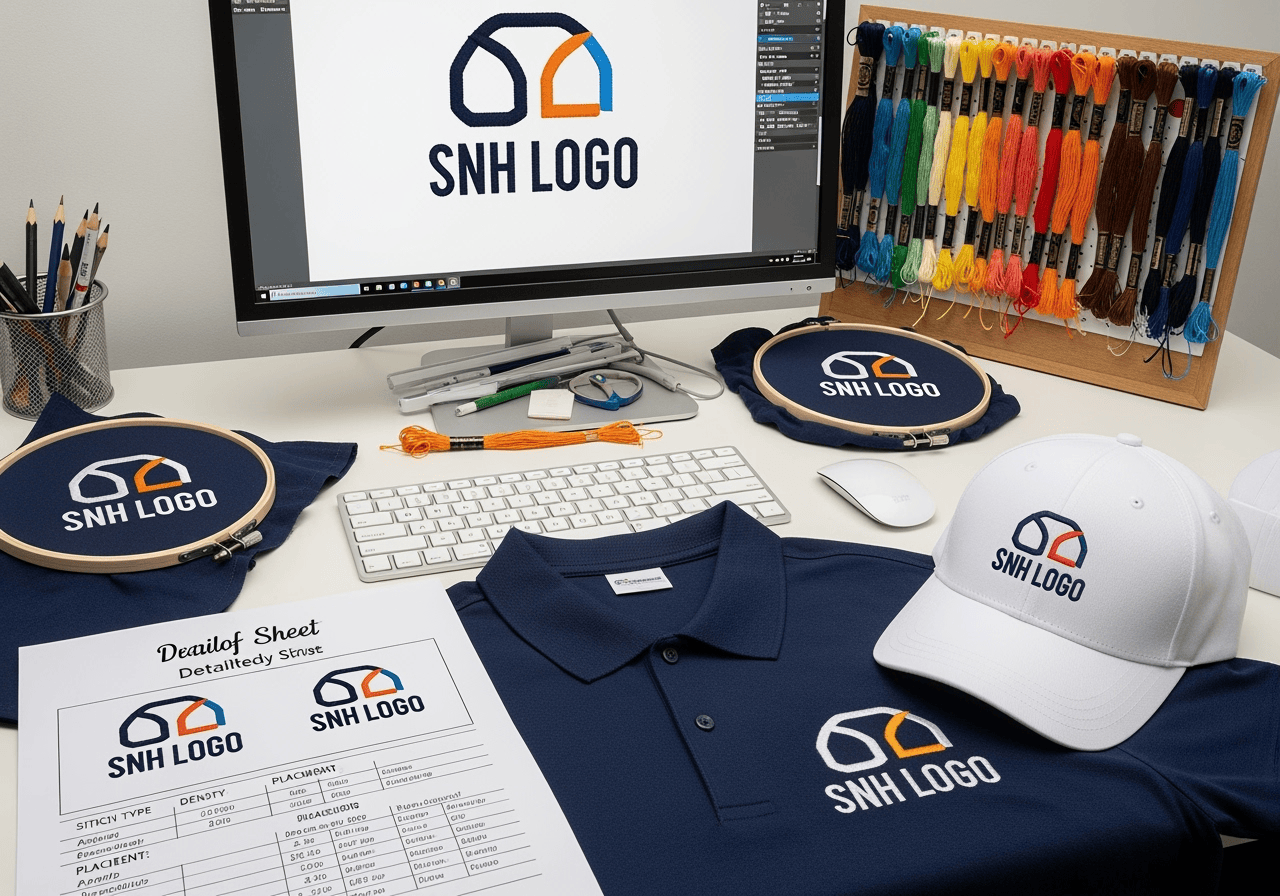 You’ve decided to level up your brand with custom embroidered apparel—solid move! But before you hit “order,” it’s worth making sure your logo is ready to shine in thread, not just pixels. Embroidery is a unique art form, and not every digital design translates perfectly to fabric. With a few smart tweaks, you can make sure your logo pops on polos, hats, jackets, bags, and more. Here’s how to set yourself up for embroidery success:
1. Keep It Simple, Bold, and Clear
Embroidery loves simplicity. Fine print, intricate details, and subtle gradients that look great on a screen might not survive the jump to thread. Tiny elements can turn into a blur or even disappear after a few washes.
Pro Tip:
Use bold, easy-to-read fonts
Stick to solid shapes and clear outlines
Ditch the drop shadows and tiny text
The simpler your logo, the cleaner—and more professional—it’ll look on fabric.
2. Size Matters (But Smaller Isn’t Always Better)
Logos that look awesome on a website or business card might lose their impact when shrunk down for a hat or sleeve. Embroidery needles need a little room to work their magic.
Pro Tip:
Make sure any text in your logo is at least 0.25" tall
Avoid super-thin lines or tiny details
If you need a small logo, create a simplified “embroidery version” just for those spots
A little extra breathing room goes a long way toward crisp, readable results.
3. Choose High-Contrast Colors
Threads don’t blend like ink. If your logo uses subtle color shifts or similar shades, those differences may disappear once stitched.
Pro Tip:
Go for strong, high-contrast color combos
Avoid pairing colors that are too similar (like navy on black or white on light gray)
Always preview your logo on the actual garment color you plan to use
The right color choices make your logo pop from across the room.
4. Mind the Thread Count
Embroidery machines use different stitch types for different effects—fill stitches for solid areas, satin stitches for outlines and text. But too many tiny details can get lost or muddled.
Pro Tip:
Solid areas? Use fill stitches for bold impact
Outlines and lettering? Satin stitches keep things sharp
Lots of tiny details? Consider simplifying or thickening them so they don’t get lost
A well-optimized logo means less risk of “thread soup” and more wow-factor.
5. Placement Is Everything
Where your logo goes matters just as much as how it looks. The size and shape should fit the space—what works on a left chest might not work on a hat or bag.
Pro Tip:
For polos, left chest logos are typically 3–4" wide
For hats, 2" tall by 4" wide is a safe bet
For sleeves or bags, adjust the orientation and size accordingly
Think about the final product, not just the design file.
6. Ask for a Proof (and Approve It!)
Before anything gets stitched, you’ll get a digital proof showing how your logo will look in thread. This is your chance to catch any issues before production starts.
Pro Tip:
Review the proof closely for color, size, and detail
Don’t hesitate to ask for tweaks or a physical “sew-out” sample for larger orders
Double-check placement and orientation
A few extra minutes here can save you a lot of headaches later.
7. Trust the Pros
Not sure if your logo will work as-is? No worries! At RM Custom Screen Printing, we’re happy to review your design and suggest embroidery-friendly tweaks. Sometimes thickening a line or simplifying a gradient is all it takes.
Pro Tip:
Let us know your vision and where you’ll use your logo
We’ll recommend the best adjustments for a clean, professional finish
Final Thoughts
A great embroidered logo isn’t just a copy-paste job from your digital artwork—it’s a carefully crafted design that looks crisp, professional, and memorable in thread. With these tips (and a little expert guidance), your brand will stand out on every piece of gear.
